Smoke Test Fields
The General tab is for recording general information with condition and scores.
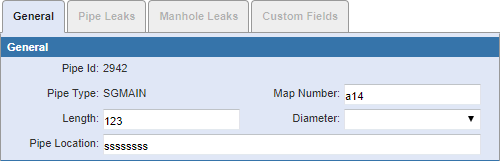
- Pipe Id: This field automatically populates with the ID associated to the selected asset.
- Pipe Type: This field automatically populates with the attribute of the Pipe Id.
- Map Number: Enter the variable character identifier from a map book, if applicable.
- Length: Enter the length, in feet. This field may be automatically populated if it is mapped to the geodatabase.
- Diameter: Enter the diameter. This field may be automatically populated if it is mapped to the geodatabase. The content of this list is populated by the administrator in Designer under Preferences > Custom Codes > SDIAM.
- Pipe Location: Enter the location. This field may be automatically populated.
The Upstream section contains information about the connected feature found upstream.
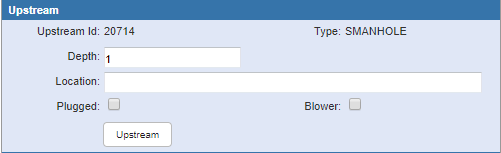
- Upstream Id: This field may be automatically populated with the upstream ID of the of the next asset in the geometric network. If there are no upstream features, the message No upstream node found appears.
- Type: This field automatically populates with the feature type of the upstream ID.
- Depth: Enter the depth for the feature, generally measured in feet. This field may automatically populate if it is mapped for the selected feature ID.
- Location: Enter the location. This field may be automatically populated with the upstream ID.
- Plugged: Select if the pipe is plugged.
- Blower: Select if a blower is used.
- Upstream: Click to change to the next asset.
 TIP: If Upstream has been clicked too many times, the best practice is to reload (refresh) the page.
The Downstream section contains information about the connected feature found downstream.

- Downstream Id: This field may be automatically populated with the downstream ID of the next asset in the geometric network. If there are no downstream features, the message No downstream node appears.
- Type: This field automatically populates with the feature type of the downstream ID.
- Depth: Enter the depth for the feature, generally measured in feet. This field may automatically populate if it is mapped for the selected feature ID.
- Location: Enter the location. This field may automatically populate with the downstream ID.
- Plugged: Select if the pipe is plugged.
- Blower: Select if a blower is used.
- Downstream: Click to change to the next asset.
TIP: If Downstream has been clicked too many times, the best practice is to reload (refresh) the page.
The Details section contains additional details about the inspection.
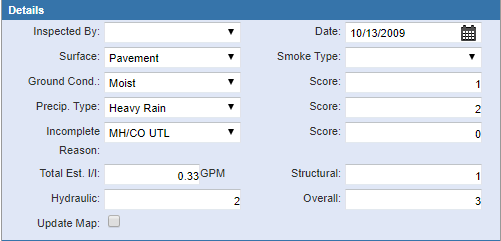
- Inspected By: Select the employee who performed the smoke test.
- Date: Enter the date of the test or select it using the calendar.
- Surface: Select the type of surface. The content of this list is populated by the administrator in Designer under Preferences > Custom Codes > SSURFC.
- Smoke Type: Select the smoke type. The content of this list is populated by the administrator in Designer under Preferences > Custom Codes > SMBOMBTY.
- Ground Cond. and Score: Select the ground condition. A score is assigned when the ground condition is selected. The contents of this list and scores are populated by the administrator in Designer under Preferences > Description Scores > SGRNDCND.
- Precip. Type and Score: Select the precipitation type. A score is assigned when the precipitation type is selected. The contents of this list and scores are populated by the administrator in Designer under Preferences > Description Scores > SPRECIP.
- Incomplete Reason and Score: Select the reason why the test was not completed. A score is assigned according to the incomplete reason selected. The contents of this list and scores are populated by the administrator in Designer under Preferences > Description Scores > SUTSC.
- Total Est. I/I: Enter the number of estimated gallons per minute for inflow and infiltration. This field may be automatically populated if configured in Designer under Inspections > Smoke Test I/I Quantities.
- Structural: Enter the rating for the structural integrity of the system.
- Hydraulic: Enter the rating to indicate the amount of inflow and infiltration (I/I) or unwanted flow into the system.
- Overall: Enter the combined rating of the system.
- Update Map: This field can be used as a flag for whatever purpose your organization wishes. For example, it could be used for instances when the map or GIS need to be updated. The administrator can search for inspections that have this field selected. The name of the field can be changed by editing the corresponding XML file.
The Comments section contains any comments about the test, repairs made, or any recommendations for further work.
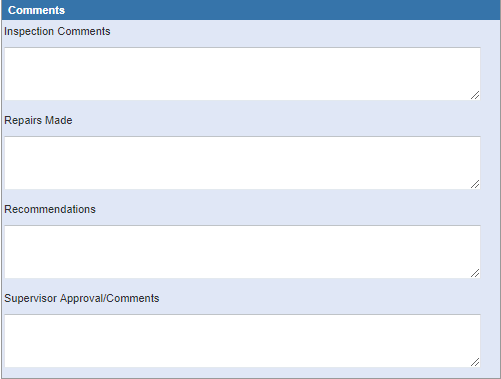
- Inspection Comments: Enter any comments about the inspection.
- Repairs Made: Enter any details about repairs that were made.
- Recommendations: Enter any recommendations from the inspector.
- Supervisor Approval/Comments: Enter comments from the supervisor's review.
The Pipe Leaks tab is used to record information about leak defects.
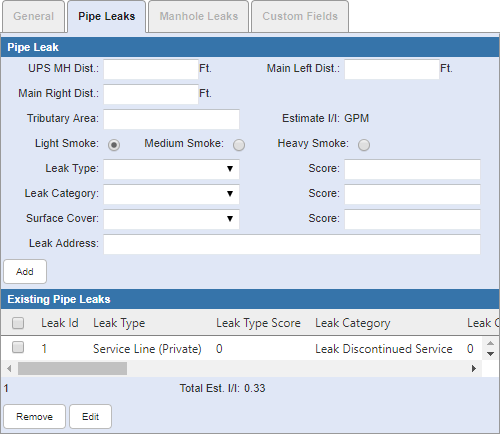
- UPS MH Dist.: Enter the distance, in feet, from the upstream manhole to where the leak is located.
- Main Left Dist.: Enter the distance of the leak, in feet, to the left from the mainline.
- Main Right Dist.: Enter the distance of the leak, in feet, to the right from the mainline.
- Tributary Area: Enter the area of the basins that flow into the selected pipe, which can be located from the map by running an upstream trace on the pipe or selecting anything that intersects with the polygon and doing a summary of it.
- Estimate I/I: This field automatically populates with the estimated inflow and infiltration in gallons per minute.
- Light Smoke: Select if the degree of smoke is light.
- Medium Smoke: Select if there is a medium degree of smoke.
- Heavy Smoke: Select if the smoke is heavy.
- Leak Type and Score: Select the leak type. A score is assigned when the leak type is selected. The contents of this list and scores are populated by the administrator in Designer under Preferences > Description Scores > SLEAKTYP.
- Leak Category and Score: Select the leak category. A score is assigned when the leak category is selected. The contents of this list and scores are populated by the administrator in Designer under Preferences > Description Scores > SLEAKCAT.
- Surface Cover and Score: Select the surface cover. A score is assigned when the surface cover is selected. The contents of this list and scores are populated by the administrator in Designer under Preferences > Description Scores > SLEAKSRF.
- Leak Address: Enter the address where the leak is located.
- Add: Click to add leak data to the Existing Pipe Leaks section.
- Remove: Click to remove the selected leak from the list.
- Edit: Click to edit the selected leak's information.
Use the Manhole Leaks tab to record any leaks associated with the connecting manholes.
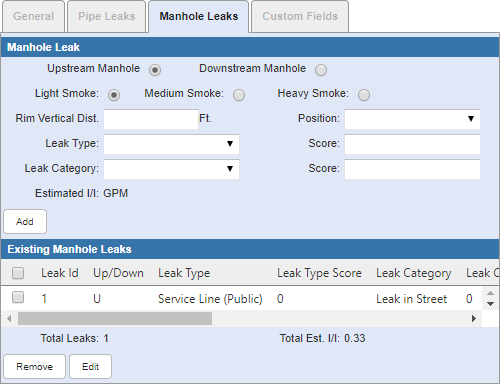
- Upstream Manhole: Select if it is applicable for the upstream manhole.
- Downstream Manhole: Select if it is applicable for the downstream manhole.
- Light Smoke: Select if the degree of smoke is light.
- Medium Smoke: Select if the degree of smoke is medium.
- Heavy Smoke: Select if the degree of smoke is heavy.
- Rim Vertical Dist.: Enter the vertical distance in feet from the rim to the leakage.
- Position: Select the clock or quadrant position for the leak. The content of this list is populated by the administrator in Designer under Preferences > Custom Codes > STVOBPOS.
- Leak Type and Score: Select the leak type. A score is assigned when the leak type is selected. The contents of this list and scores are populated by the administrator in Designer under Preferences > Description Scores > SLEAKTYP.
- Leak Category and Score: Select the leak category. A score is assigned when the leak category is selected. The contents of this list and scores are populated by the administrator in Designer under Preferences > Description Scores > SLEAKCAT.
- Estimated I/I: This field automatically populates with the inflow and infiltration in gallons per minute.
- Add: Click to add the observation to the Existing Manhole Leaks section.
- Edit: Click to edit the selected leak's information.
- Remove: Click to remove the selected leak.
